How to Integrate Freshdesk With ProProfs Knowledge Base
Integrating ProProfs Knowledge Base with Freshdesk provides instant self-help and a smart ticketing experience for your customers. This integration embeds a Freshdesk support form in your Knowledge Base and directs all tickets submitted by customers to your Freshdesk account.
Here is how the Freshdesk Support form appears on your help site:

Benefits of Integrating ProProfs Knowledge Base With Freshdesk:
-
Customer feedback gets automatically collected in the Freshdesk helpdesk.
-
Minimize customer tickets with instant search suggestions.
-
Integration ProProfs Knowledge Base easily using the Freshdesk credentials.
How to Integrate Freshdesk With ProProfs Knowledge Base
Step 1: In your ProProfs Knowledge base account, go to Settings > Integrations.

Step 2: Navigate to Feedback Forms and click Freshdesk.

Step 3: Click “Add Freshdesk.”

Step 4: Enter the Username, Helpdesk URL, and API key.

Step 5: Select the required labels and click Next.
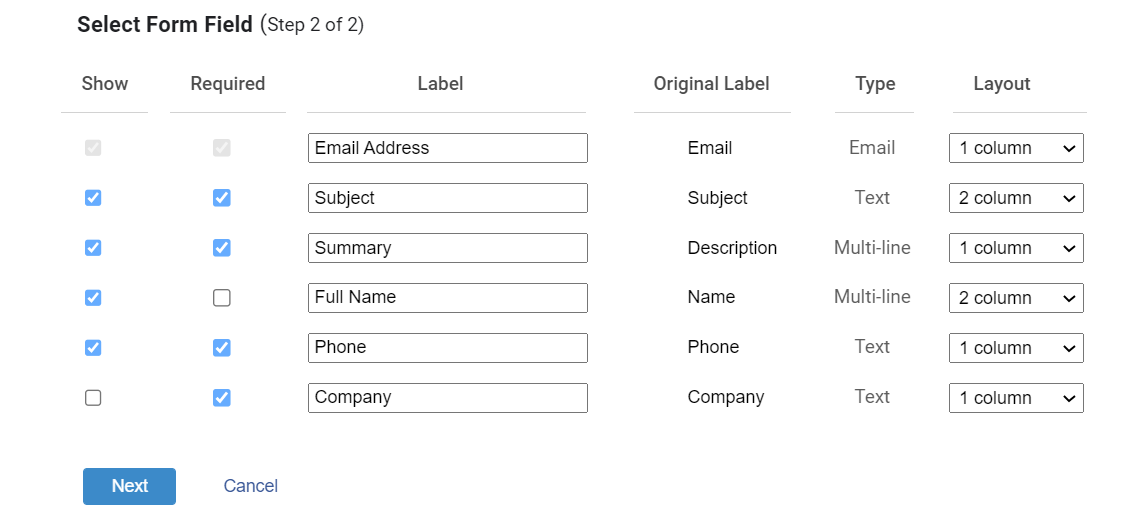
After clicking Next, you will get an option to customize the support form.
Customizing the Support form
First, we have the Form Settings
Step 1: Enter the “Form Title” and “Thank you message.”
Step 2: Check the settings options as per your requirement.
Step 3: Adjust the support form using the height and Background Overlay option.

Here is a short description of options available in Form Settings
-
Form Title - Enter a form title.
-
Thank you message - The thank you message will be shown after the form has successfully been submitted.
-
Allow attachment - Select this option if you want to allow users to attach files to the case.
-
Enable search suggestions (ticket deflection) - As the user types in a subject for the case, pages from your ProProfs site are instantly suggested. The goal is to help users find what they are looking for so they don't have to submit a case. This is often referred to as ticket deflection, as it helps customers find answers without ever having to submit a case.
Here is how the search suggestion appears

-
Show placeholder text in form fields - Select this option if you want placeholder text to be in the form fields.

-
Lightbox Height - Enter the height of the lightbox window. The default height is 500 pixels.
-
Background Overlay - Select if you want the lightbox to have a transparent (80%) background overlay color.
You can also test the form anytime by clicking the Test button.
Next, in the Tab Settings,
Step 1: Select “Enable tab."
Step 2: Select the tab type as text or image.
Step 3: Edit the label text, background, and text color.
Step 4: Set the CSS as default or custom.

Here is a short description of options available in the Tab settings
-
Enable Tab - Unselect if you do not want to use the tab.
-
Type - You can use the default 'text' tab or upload an image.

-
Position - Choose the position of the tab (top, bottom, left, or right). Changing will instantly update so you can preview it. You can also change the offset to move the tab to the desired location.
-
Label - Enter the text of the label. The default is 'Support,' but you can use other options such as Feedback, Help, Questions, Comments, Email, or Ask Us.
-
Background and Text color - Use the color picker to select the tab's color. You can also change the color of the text.
-
CSS - You can enter your custom CSS for the tab for more advanced customizations.
Finally, we have the Embed options for the Support form.

Here is a short description of embed options
-
Lightbox - This option allows you to add hyperlinks anywhere inside of ProProfs to open the support form in a lightbox. You can add the link in your navigation or anywhere on a page that will open the lightbox when clicked. Simply copy the provided hyperlink code: <a href="#" rel="supportlightbox">Support</a> and paste it on any page or in your header. You can see a link we added to the custom header called 'Support' below.
-
Popup - This option works best for external websites and web applications. Just copy the provided code and paste it into your website. Clicking the link will open the support form in a pop-up window.
-
Embed Code - If you want to embed just the form (no lightbox or pop-up window), then you can use this code. Copy the provided code and paste it into the source code of any external website page.
Click Save to apply the changes in the Support form.
You will get a confirmation on successfully adding a Salesforce Support form. Click “Go to Preview.”
That is all about integrating Freshdesk with ProProfs Knowledge Base.