How to Add & Use Merge Tags
A merge tag is a small placeholder tag that may consist of a few words or strings of text, which you can add to any page on your help site. You can create merge tags once and use them multiple times across different pages on your help site.
Merge tags are flexible and reusable. You can make site-wide changes by editing the merge tag source. It saves you from the tedious task of modifying tags on different pages separately.
There are two types of merge tags:
1. System merge tags - These are pre-defined tags that you can reuse to quickly update a page’s content. You cannot alter or edit these tags.

2. Custom merge tags- You can create tags per your requirements and add them to pages on your help site.

In this article, you'll learn:
- How to Create a Merge Tag
- How to View, Edit, and Delete Merge Tags
- How to Add a Merge Tag to a Page
- How to Add Custom Color to Merge Tags
How to Create a Merge Tag
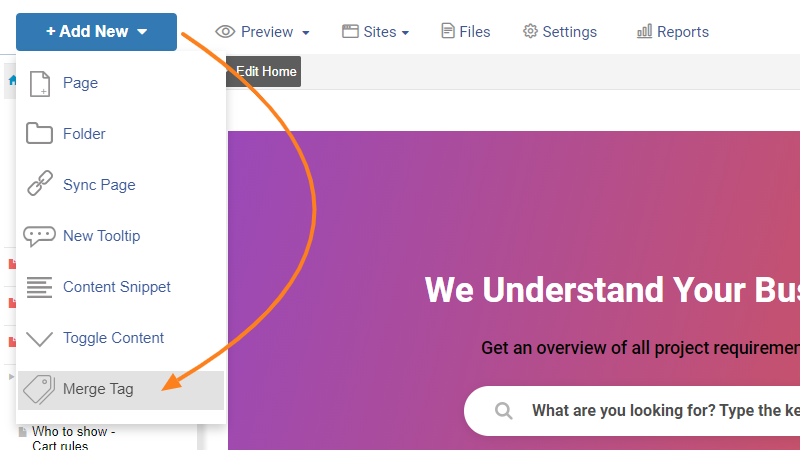
Step 1: On your ProProfs Knowledge Base dashboard, go to +Add New > Merge Tag.
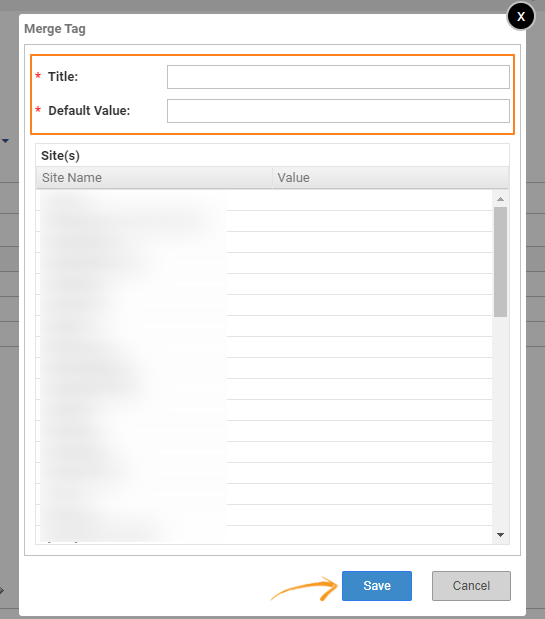
Step 2: Provide the Title and Default Value for the placeholder. Click on Save.
-
Title - Enter the name of the tag you want to create.
-
Default Value - Enter the default value of your tag. This value will display by default if you haven't defined any tag value.
You have successfully added a new merge tag.
How to View, Edit, and Delete Merge Tags
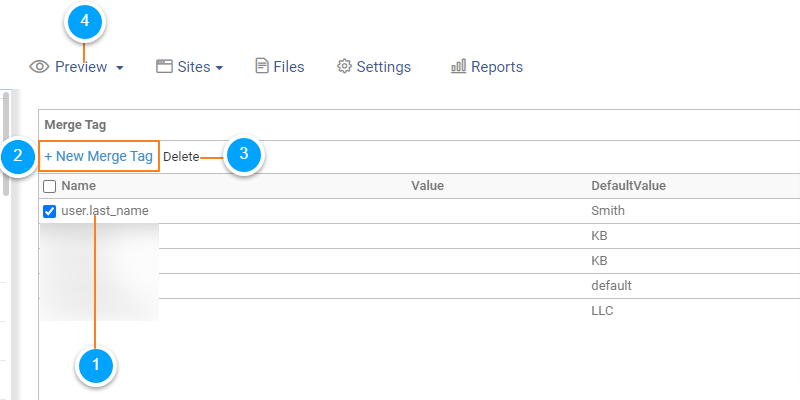
After adding a new merge tag, you will see a window displaying all the custom tags you have created till now.
Follow the screenshot instructions.
-
Edit a merge tag by clicking on its name.
-
Create a new merge tag.
-
Delete a merge tag.
-
You can access the page through Preview > Merge Tags.
How to Add a Merge Tag to a Page
Step 1: Navigate to the page in the TOC where you wish to add the merge tags and click Edit Page.

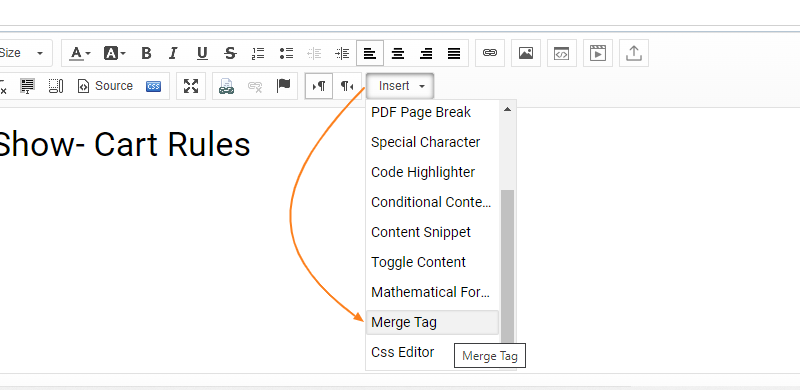
Step 2: Go to Insert > Merge Tag in the toolbar.
Step 3: Select the System Merge Tag or Custom Merge Tag and click Insert to add it to the page.
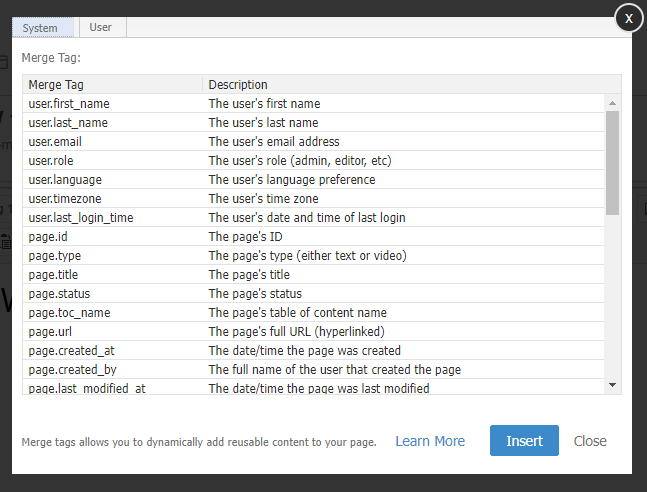
When to Use System Merge Tags
ProProfs Knowledge Base offers a library of system merge tags you can use at a click. Here are some scenarios where you can use system merge tags:
1. User Identification - Use these tags to identify the profile of the author or editor who created or made changes/edits to a particular page on your help site.
| Tag Name | Description |
|---|---|
| user.first_name | Display the first name of the user. |
| user.last_name | Display the last name of the user. |
| user.email | Display email address of the user. |
| user.role | Display the role of the user like admin, editor, etc. |
| user.language | Display the language preference of the user. |
| user.timezone | Display timezone of the user |
| user.last_login_time | Display the last login date and time of the user. |
2. Page identification - Use these tags to identify the attributes of a page, such as its title, id, status, etc.
| Tag Name | Description |
|---|---|
| page.id | Display unique id of the page. |
| page.type | Display the type of the page as text or video. |
| page.title | Display the title of the page. |
| page.status | Display status of the page like published, draft, etc. |
| page.toc_name | Display the name of the page on the table of content. |
| page.url | Display URL of the page. |
| page.created_at | Display the date and time of the page when the page was created. |
| page.created_by | Display full name of the user who created the page. |
| page.last_modified_at | Display date and time of the page when the page was last modified. |
| page.last_modified_by | Display full name of the user who modified the page last time. |
| page.published_at | Display date and time of the page when the page was last published. |
| page.published_by | Display full name of the user who published the page last time. |
| page.related_articles | Display the related articles on the page. |
| page.published_till | Display the expiry date of the page. |
3. Navigation - Use these tags to add navigation menus to a page, such as the "Next" or "Previous" link, breadcrumbs, inline, and more.
| Tag Name | Description |
|---|---|
| page.next_page | Display a hyperlink of the next page based on the table of content order. |
| page.next_page_url | Display URL of the next page based on the table of content order. |
| page.previous_page | Display a hyperlink of the previous page based on the table of content order. |
| page.previous_page_url | Display URL of the previous page based on the table of content order. |
| page.breadcrumb | Display the breadcrumb based on the table of content. Ex - You are here XYZ. |
| page.pages_in_folder | Display all the pages located in the folder. |
| page.folder_name | Display the name of the folder in which the page is located. |
| page.children_pages | Display all the pages located inside the page as a hyperlink. |
| page.inline_toc | Scan the headings on the current page to create an inline table of content based on those headings |
| page.embed_page | Display the embedded page. |
4. Additional information - Use these tags to give additional information about your company, website, recently published pages in your knowledge base and more.
| Tag Name | Description |
|---|---|
| site.name | Display the name of the help site. |
| site.url | Display the URL of the help site. |
| site.language | Display the language of the help site. |
| site.recently_published_pages | Display the most recently published page. |
| company.name | Display company name. |
| company.website | Display company website. |
How to Add Custom Color to Merge Tags
Once you add the merge tag, click the tag and go to the text color in the toolbar. Select the color for your merge tag.
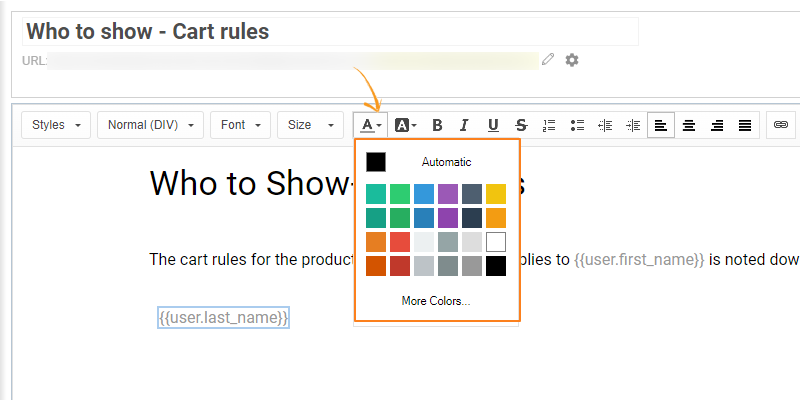
After selecting a color, save the page and click Preview.
That is all about adding & using merge tags in your knowledge base.